
The Woodhaven Garage Saga
By Leonard Oliver Nasman, copyright 2000
An account of the designing and construction of an attached garage at the Woodhaven house
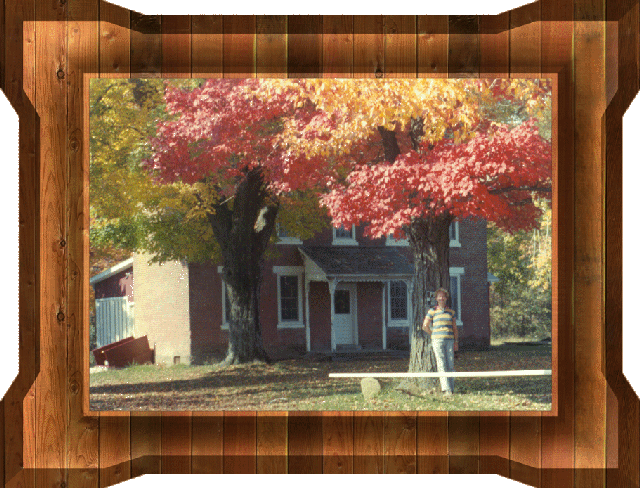
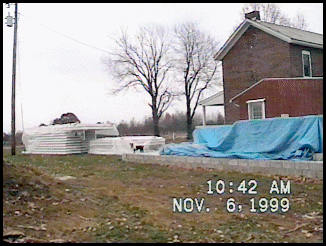
The Woodhaven House, fall 1989
Introduction
From early in our ownership of the Woodhaven House, I decided that a garage was needed. When we first bought the place in the fall of 1987, it was clear that the first priorities were to replace the bathroom with one that had a proper foundation and septic system, to have a proper well drilled, add a cover for the cellar door, and to fix the south porch. The bathroom that was in place in 1987 had been built by simply enclosing an old north porch. There was no proper foundation, and a primitive home-made septic system had apparently been built many years before. The old south porch was suffering from neglect and had large holes in the floor that made it quite unsafe. To solve these problems, Steve and I tore down the old porches and I contracted to have a proper foundation for a new south porch, bathroom, and a small bedroom on the north west side of the house. Along with this construction, a proper septic system and leach field was installed, and a new well was drilled in the front yard to replace the old hand dug well that was just off of the old south porch.
 In the process of having
the new foundation built, I anticipated the future addition of an attached garage on the north side of the house. So, I had the builder add a row of concrete
foundation blocks along the north side of the house. This would eliminate the need for digging against the house when it came time to add the garage.
That was in the summer of 1988, and it was not until a little more than ten years later that the garage project actually got under way. But, the foundation
for one side of the garage only required the removal of a couple of inches of dirt to reveal the concrete blocks placed earlier.
In the process of having
the new foundation built, I anticipated the future addition of an attached garage on the north side of the house. So, I had the builder add a row of concrete
foundation blocks along the north side of the house. This would eliminate the need for digging against the house when it came time to add the garage.
That was in the summer of 1988, and it was not until a little more than ten years later that the garage project actually got under way. But, the foundation
for one side of the garage only required the removal of a couple of inches of dirt to reveal the concrete blocks placed earlier.
The Garage Design
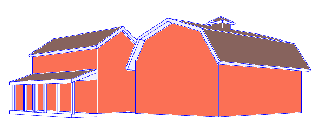
A lot of garage designs were considered and discarded. Everything from a large three car garage to a simple stick built minimum garage were considered. One design had a second story with room for a small apartment and featured a gambrel roof.
 The final design
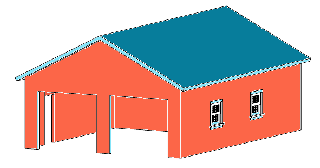
was an extended two car garage with room for a bathroom and space for a workshop.
The final design
was an extended two car garage with room for a bathroom and space for a workshop.
 After considering various
alternatives for the structure, including common stick built walls, concrete block, and concrete filled Styrofoam block, I decided to go with SIPS
(Structural Insulated Panel System). This material consists of a layer of foam laminated between two sheets of oriented strand board. It is very strong
and is rated to withstand 140 mile per hour winds. The six inch thick panels selected are rated at R 29, thus providing excellent insulation as well
as strength.
After considering various
alternatives for the structure, including common stick built walls, concrete block, and concrete filled Styrofoam block, I decided to go with SIPS
(Structural Insulated Panel System). This material consists of a layer of foam laminated between two sheets of oriented strand board. It is very strong
and is rated to withstand 140 mile per hour winds. The six inch thick panels selected are rated at R 29, thus providing excellent insulation as well
as strength.
One factor contributing to the decision to go ahead with the garage project at this time was the sale of our Colorado mountain property. The place we called Ponderosa Hill was our weekend retreat when we lived in Colorado. When we left there in 1978 we expected to return in a few years. But, it now looked like that would not happen, so it was decided to sell the property and put the money in Woodhaven where we could enjoy it nearly every weekend. So, the decision was made, and the project got underway in the fall of 1999.
Getting Started
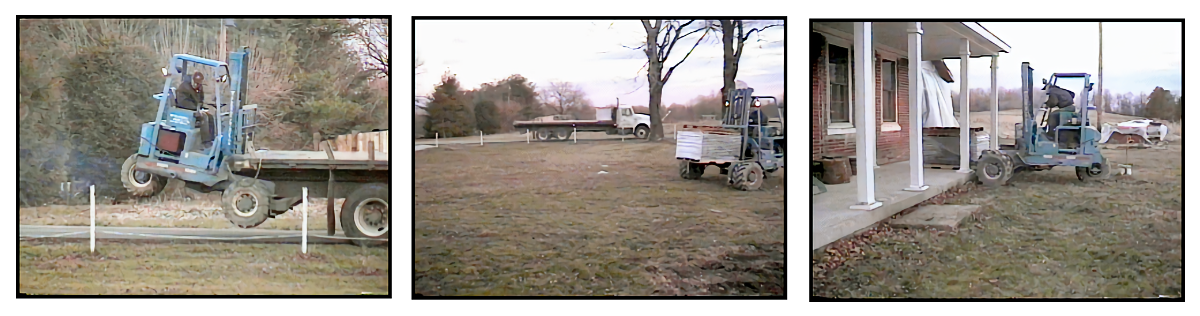
 I contacted the contractor,
Joe Ferguson, who had built the foundation and walls for the 1988 porch and bathroom addition to the house. At this point the crew consisted of Joe and
his son. In spite of never having built using SIPS before, he was familiar with the material and agreed to take on the project. The first step was to
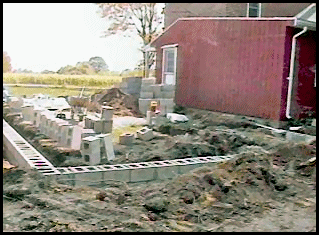
expose the block foundation along the side of the house and add a footer and foundation blocks for the rest of the garage.
I contacted the contractor,
Joe Ferguson, who had built the foundation and walls for the 1988 porch and bathroom addition to the house. At this point the crew consisted of Joe and
his son. In spite of never having built using SIPS before, he was familiar with the material and agreed to take on the project. The first step was to
expose the block foundation along the side of the house and add a footer and foundation blocks for the rest of the garage.
A sewer line was connected to the line running from the house bathroom to the septic system. When the septic system was installed, this step had been anticipated and a Y connector was placed in the buried pipe. Unfortunately, the digging process broke the old pipe before the Y connector was found. No big problem, a new Y connector was added, and the old pipe was patched.
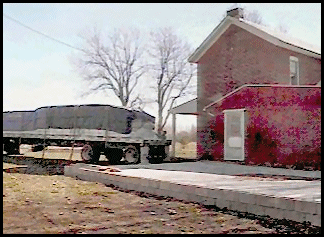 After the foundation was
in place, the garage floor was poured. Pressure treated two by sixes were fastened to the foundation to provide an anchor for the wall panels. Then a 50
foot long flat bed truck arrived with all of the panels for the walls and roof.
After the foundation was
in place, the garage floor was poured. Pressure treated two by sixes were fastened to the foundation to provide an anchor for the wall panels. Then a 50
foot long flat bed truck arrived with all of the panels for the walls and roof.
The SIPS
 I had talked with two
different suppliers of the structural panels. Although this is a fairly new building system, the panels are in fairly high demand. The first company
indicated that it would take at least eight weeks to deliver the panels. Since it was late October, this was not good. The second company contacted
indicated that standard panel sizes could be delivered in three weeks. This company is in Newcomerstown, Ohio so I took a drive to the factory to see
what they were all about. I was favorably impressed with the operation and left a copy of the garage design drawings for them to use in determining
the number and sizes of panels required.
I had talked with two
different suppliers of the structural panels. Although this is a fairly new building system, the panels are in fairly high demand. The first company
indicated that it would take at least eight weeks to deliver the panels. Since it was late October, this was not good. The second company contacted
indicated that standard panel sizes could be delivered in three weeks. This company is in Newcomerstown, Ohio so I took a drive to the factory to see
what they were all about. I was favorably impressed with the operation and left a copy of the garage design drawings for them to use in determining
the number and sizes of panels required.
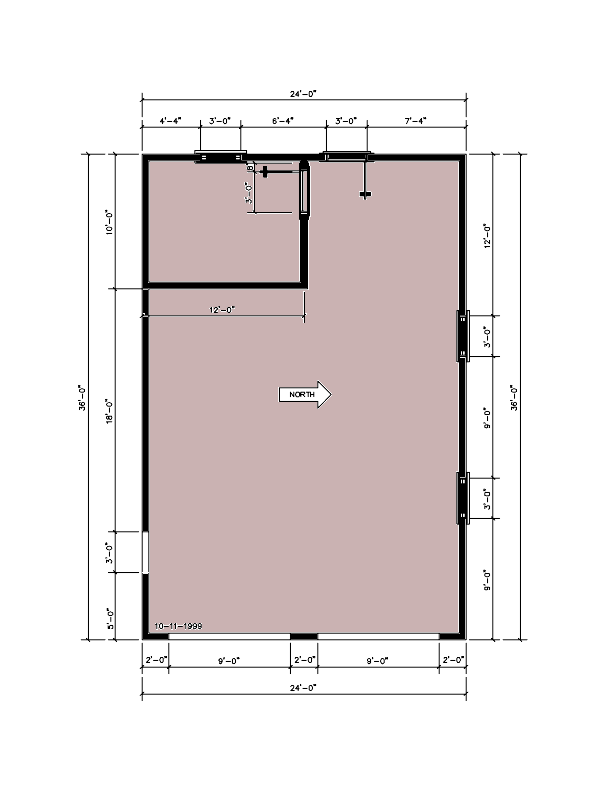
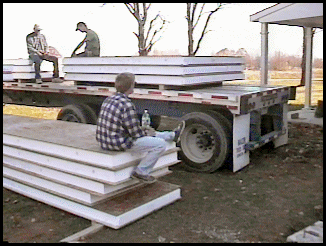
 I understood that the
standard panel size was four foot wide and in two foot length increments starting at eight feet. The walls were designed to be ten feet high (to handle
a slightly higher than normal garage door). The overall dimensions of the garage were 24 by 36 feet. When the truck arrived with the panels, I was
surprised to find eight foot by ten foot wall panels (instead of the expected four by ten foot panels). The panels for the bathroom/workshop area
ceiling were eight foot by 24 foot (instead of the expected four foot by twelve foot). All of these panels (much heavier than expected) had to be
unloaded by Joe, his son, the truck driver, and myself. But, after some pushing and sliding, all of the panels were off of the truck and stacked
in the yard.
I understood that the
standard panel size was four foot wide and in two foot length increments starting at eight feet. The walls were designed to be ten feet high (to handle
a slightly higher than normal garage door). The overall dimensions of the garage were 24 by 36 feet. When the truck arrived with the panels, I was
surprised to find eight foot by ten foot wall panels (instead of the expected four by ten foot panels). The panels for the bathroom/workshop area
ceiling were eight foot by 24 foot (instead of the expected four foot by twelve foot). All of these panels (much heavier than expected) had to be
unloaded by Joe, his son, the truck driver, and myself. But, after some pushing and sliding, all of the panels were off of the truck and stacked
in the yard.
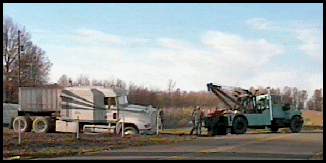 Do you remember Murphy’s
Law? Anything that can go wrong will. Well, on the way out of the yard, the big truck sunk up to the axel in the soft dirt where they had put in the Burr
Oak water line. It took a big wrecker truck to pull it out.
Do you remember Murphy’s
Law? Anything that can go wrong will. Well, on the way out of the yard, the big truck sunk up to the axel in the soft dirt where they had put in the Burr
Oak water line. It took a big wrecker truck to pull it out.
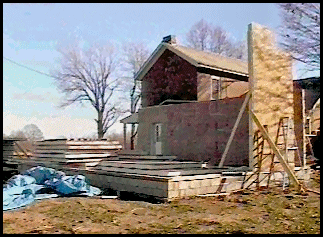 Well, now the panels
were here and it was time to start putting them up. Remember Murphy? The panels are normally joined together by splines that are placed in grooves pre-cut
into the foam along the vertical edges of the panels. But, the guy who made the panels did not add the proper grooves. This meant that we had to use a hot melt tool to make grooves in each end of the panels to fit 2 by 6 pieces of lumber. A time consuming process. Structural adhesive was put on all edges of the groove before the 2 by 6 was inserted and nailed in place. A second 2 by 6 was nailed to the first. This acted like a tongue that was then inserted into the groove in the next panel. This makes for a very strong joint that is also air tight. So in addition to the good insulation properties of the panels, they also have much less air infiltration than conventional stick built walls.
Well, now the panels
were here and it was time to start putting them up. Remember Murphy? The panels are normally joined together by splines that are placed in grooves pre-cut
into the foam along the vertical edges of the panels. But, the guy who made the panels did not add the proper grooves. This meant that we had to use a hot melt tool to make grooves in each end of the panels to fit 2 by 6 pieces of lumber. A time consuming process. Structural adhesive was put on all edges of the groove before the 2 by 6 was inserted and nailed in place. A second 2 by 6 was nailed to the first. This acted like a tongue that was then inserted into the groove in the next panel. This makes for a very strong joint that is also air tight. So in addition to the good insulation properties of the panels, they also have much less air infiltration than conventional stick built walls.
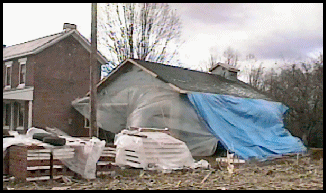
Adding the Roof "
 After the walls were in place,
the November weather turned bad with some forecasted rain. I tried to rig some tarps to protect the wall panels. Since the ridge beam was not yet in place,
I stretched some rope across to hold the tarps. Mostly, all I accomplished was to make a great rain collector. One morning I poured thirty or forty gallons
of water out of the tarps, into buckets, five gallons at a time. It also started to get cold, but we were generally lucky with the weather considering how
late in the season it was.
After the walls were in place,
the November weather turned bad with some forecasted rain. I tried to rig some tarps to protect the wall panels. Since the ridge beam was not yet in place,
I stretched some rope across to hold the tarps. Mostly, all I accomplished was to make a great rain collector. One morning I poured thirty or forty gallons
of water out of the tarps, into buckets, five gallons at a time. It also started to get cold, but we were generally lucky with the weather considering how
late in the season it was.
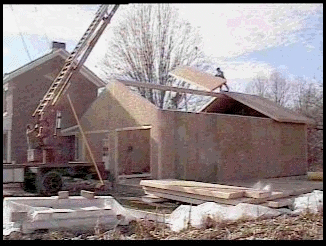
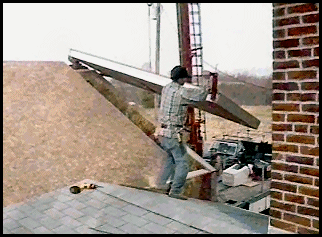 Now it was time to put the
panels on the roof. These were four foot by sixteen foot pieces that weighed about 200 pounds each. Some time was spent cutting the proper angles on the
ends of the panels and adding the required two by sixes. For the job of lifting the roof panels, a crane was brought in.
Now it was time to put the
panels on the roof. These were four foot by sixteen foot pieces that weighed about 200 pounds each. Some time was spent cutting the proper angles on the
ends of the panels and adding the required two by sixes. For the job of lifting the roof panels, a crane was brought in.
 It took from 8:30 in the
morning to 4:00 in the afternoon to lift and place all of the roof panels.
It took from 8:30 in the
morning to 4:00 in the afternoon to lift and place all of the roof panels.
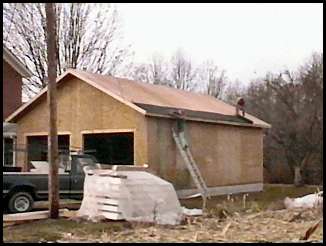 Soon after they were in place,
tar paper was nailed on the roof and the garage was now pretty much protected from the weather.
Soon after they were in place,
tar paper was nailed on the roof and the garage was now pretty much protected from the weather.
 And, not a moment too soon.
 The next challenge was
putting the panels on the ceiling of the bathroom/workshop area. These were supposed to be four by twelve foot panels that two guys could handle pretty well.
But, they had sent eight by twenty four footers. The solution was to rip eight foot wide panel into two four footers. We then tipped one end of the panel
up onto the wall panels (which are eight foot high in this area). Then my shiny new big blue tractor started earning its keep. I got the front bucket under
the panel and lifted it up to where it could be slid into place.
The next challenge was
putting the panels on the ceiling of the bathroom/workshop area. These were supposed to be four by twelve foot panels that two guys could handle pretty well.
But, they had sent eight by twenty four footers. The solution was to rip eight foot wide panel into two four footers. We then tipped one end of the panel
up onto the wall panels (which are eight foot high in this area). Then my shiny new big blue tractor started earning its keep. I got the front bucket under
the panel and lifted it up to where it could be slid into place.
Shingles Delivered
The next chapter in the saga is the delivery of the shingles. The problem was that I had to be there when the shingles arrived. The driver was late because of an earlier delivery and arrived long after five in the afternoon when there was no one there to help unload the truck. But, for once things worked out OK. The shingle truck had a self-loading fork lift.
It picked a pallet of shingles off the truck. And dropped them right on the front porch.
One of the amazing things about the times in which we live is how modern machines allow one person to do work in a few minutes that used to require a whole crew of workers a few hours to accomplish.
 Now it was getting into
December. Not the best time to start laying brick on the garage walls. But, Joe managed to get a few courses laid by working in a tent made from the tarp
I used to try to protect the walls from the rain earlier in the project.
Now it was getting into
December. Not the best time to start laying brick on the garage walls. But, Joe managed to get a few courses laid by working in a tent made from the tarp
I used to try to protect the walls from the rain earlier in the project.
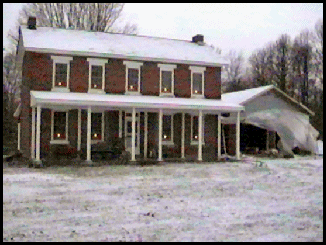
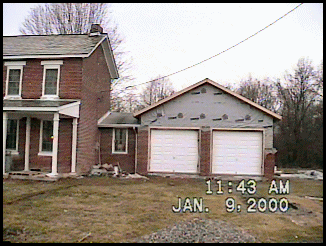 As the weather got colder
and December turned to January, it no longer made sense to continue, so the project was put on hold. But, the roof was covered, some bricks had been laid,
and the doors were installed. The garage was ready to resist the winter storms. So, we could now relax until the weather got better in the spring
As the weather got colder
and December turned to January, it no longer made sense to continue, so the project was put on hold. But, the roof was covered, some bricks had been laid,
and the doors were installed. The garage was ready to resist the winter storms. So, we could now relax until the weather got better in the spring
Spring, 2000
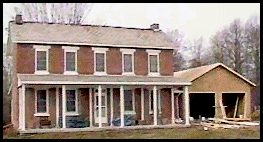
When the weather got warmer Joe continued adding bricks to the outside. By June, the front and north sides were completed and trim was added. The garage was now starting to look like it belonged. A concrete pad was poured in front of the garage doors and some gravel was added to form a new driveway.
At this point there was still some brickwork to be completed on the back of the garage, and most of the interior has to be completed. But the garage now protects the big blue tractor and keeps the car out of the sun and rain whenever we make one of our nearly weekly visits.
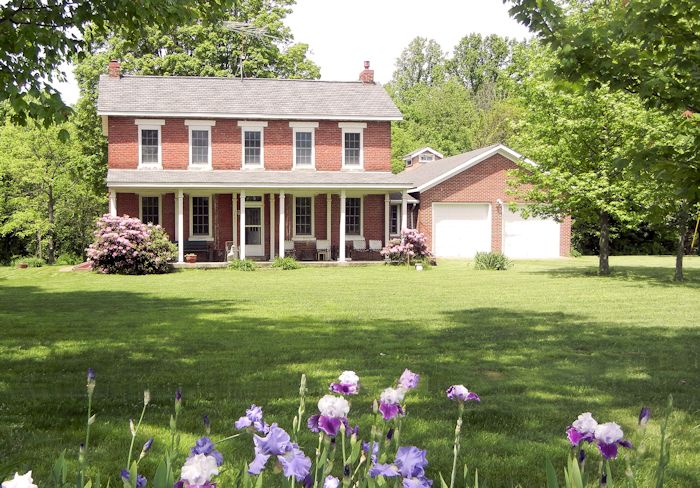
Spring, 2011
By 2011 the garage has had a lot of experience. The gravel in the driveway is invisible under the grass, but is still a solid driving surface. The garage has added value and convenience to the Woodhaven House.
